Wednesday, June 30, 2010

No-Bake Chocolate Cheesecake

No-Bake Chocolate Cheesecake

1-1/2 cups dark Chocolate Chips or Semi-Sweet Chocolate Chips
1 package (8 oz.) cream cheese, softened
1 package (3 oz.) cream cheese, softened
1/2 cup sugar
1/4 cup (1/2 stick) butter or margarine, softened
2 cups frozen non-dairy whipped topping, thawed
1 packaged graham cracker crumb crust (6 oz.)

Place chocolate chips in small microwave-safe bowl. Microwave at MEDIUM (50%) 1 minute; stir. If necessary, microwave at MEDIUM an additional 15 seconds at a time, stirring after each heating, just until chips are melted when stirred. Set aside to cool.

Beat cream cheese, sugar and butter in large bowl on medium speed of mixer until creamy. Gradually add melted chips, beating on low speed until blended. Fold in whipped topping until blended; spoon into crust.

Refrigerate until firm. Garnish as desired. Cover; refrigerate leftover cheesecake.

Easy Chocolate Nut Toffee

Easy Chocolate Nut Toffee

1-1/2 paper packages of graham crackers
1 cup broken pecans
1 cup butter (2 sticks)
1/2 cup granulated sugar
1/2 cup brown sugar
pinch of salt
1-1/4 cups semisweet chocolate chips
1 cup milk chocolate chips

Preheat oven to 350 degrees F. Line a 15x10" jelly roll pan with foil, then spray the foil with nonstick baking spray containing flour. Cover the pan with a single layer of graham crackers, breaking them into pieces to fit if necessary. Only make one layer. Arrange the pecans evenly over the graham crackers.

Combine the butter, sugars, and salt in a heavy saucepan. Bring to a rolling boil, stirring constantly, until the butter is absorbed and the mixture becomes smooth and thick. You have to stir with a wire whisk continuously after the butter melts. It will seem like the mixture will never become smooth and blended, but it will! Just keep stirring. Then spoon the cooked syrup evenly over the crackers to coat.

Bake at 350 degrees for 10-12 minutes, until topping is bubbly all over the surface. Immediately sprinkle with the chocolate chips. Let stand 2 minutes, then gently marble the chocolate with the tip of a knife.

Let the pan cool, then peel the foil off the toffee, break into pieces, and serve. Be sure to be very careful with that hot sugar syrup - it can burn like the dickens. Makes about 36 pieces.

Tuesday, June 29, 2010

Simplest Fudge in the World!


1 (12-ounce) package semisweet chocolate chips
1 (14-ounce) can sweetened condensed milk
1/2 cup milk chocolate chips, if desired

Place chips and milk in microwave safe bowl. You can use just the one package of semisweet chocolate chips, or add the milk chocolate chips for a fudge that is slightly sweeter and creamier.

Microwave on medium power for 2-3 minutes, stirring after 2 minutes. Microwave, stirring at 1 minutes intervals, until chips are melted and mixture is smooth and thick.

Pour into greased 8" square pan and cool. You can also melt the chips and milk in a heavy saucepan over low heat. Makes about 2 pounds candy.

You can add just about anything to this easy recipe. Stir in a cup of chopped nuts, add a cup of marshmallows after the cooking time is done, stir in chopped dried fruit or some white chocolate chips.

Have fun with the simplest fudge recipe in the world!

Monday, June 28, 2010

How to Select the Best Dark Chocolate


Does that mean you need to know the difference between Godiva and Hershey's? Nope. Choosing the best chocolate means knowing what's in it. If you pay attention to the ingredients, you will be able to select the best chocolate almost every time.

Dark chocolate should have:

1) Cocoa liquor. Sometimes called cocoa mass, cocoa solids, cocoa, or chocolate. (It is not actually a liquor and does not contain any alcohol.)
2) Sugar. Cane juice, molasses, and other natural sweeteners are acceptable substitutes.
3) Cocoa butter.
4) Vanilla. (optional) Vanillin is a fake vanilla made from pine sap. Avoid it!
5) Soy lecithin. (optional) It's used to make the chocolate bind together better. It is sold as a health food supplement, though some argue that it is not healthy.
6) Any add-ins, such as nuts, fruits, or flavorings. Make sure none are artificial or hydrogenated.

Friday, June 25, 2010

How to Put Movies into Chocolate?

There is no doubt that Chocolate is such a popular item, you can find it everywhere and many major movies are about Chocolate or at least have some Chocolate touch. Some of the best films about Chocolate are:

Chocolat (2000)

This movie, starring Juliette Binoche and Johnny Depp, tells the story of a woman who cannot settle down and travels the world with her six-year-old daughter. The woman, called Vianne Rocher, opens a chocolate shop every time she moves into a new city and the film starts when she arrives in a small conservative town in the South of France. This film is based on the homonyms book, Chocolat, written by Joanne Harris.

Charlie and the Chocolate Factory (2005)

Starring Johnny Depp, this film is a remake of an old movie, called Willy Wonka & the Chocolate Factory, made in 1971. Both books are based on the novel for children, Charlie and the Chocolate Factory, written by British author Roald Dahl.
Charlie and the Chocolate Factory tells the story of a child from a poor family, who wins one of the golden tickets to visit the mythical Chocolate factory belonging to Willy Wonka.

Consuming passions (1988)

This film, titled ‘Cioccolato Bollente’ in Italian, was made in the UK and is a grotesque comedy about a young executive who tries to modernise a chocolate factory.

Like Water for Chocolate (1993)

This movie is based on a novel by the Mexican author Laura Esquivel. It tells the story of a strong passion between the youngest of three daughters of a widow in a remote ranch and Pedro. Pedro falls in love with the widow’s youngest daughter, Tita. However, Tita’s father wants to keep to the family tradition that the youngest daughter cannot marry until the oldest has. So, Pedro marries Tita’s oldest sister to remain close to Tita. Pedro and Tita keep having a highly sensual relationship, through the food that Tita prepares for Pedro. The expression ‘like water for chocolate’ (como agua para chocolate in Spanish) in Spanish speaking countries has a double meaning and it is a metaphor for describing a state of passion or sexual arousal.

Wednesday, June 23, 2010

Chocolate Cherry Cake

Chocolate Cherry Cake

1 cup dried tart cherries, snipped
1/4 cup brandy or orange juice
5 ounces semisweet chocolate, cut up
1/4 cup margarine or butter
3 eggs
2/3 cup sugar
1/4 cup milk
1 teaspoon vanilla
1/2 cup all-purpose flour
1/3 cup finely chopped walnuts
1 recipe Chocolate Glaze (see below)
Fresh cherries (optional)

In a microwave-safe bowl combine dried cherries and brandy. Micro-cook, uncovered, on 100% power (high) 45 seconds; set aside. Combine chocolate and margarine or butter. Micro-cook on high 1-1/2 to 2 minutes or until melted, stirring every 30 seconds. Set aside.

In a medium bowl beat eggs and sugar with an electric mixer on high speed about 5 minutes or until thick and lemon colored. Beat in chocolate mixture, milk, and vanilla. Beat in flour. Stir in undrained cherries and nuts.

Pour into a greased and floured 8-inch springform pan or 9x1-1/2-inch round baking pan; place on a baking sheet. Bake in a 350 degree F oven until a toothpick inserted near center comes out clean, allowing 45 to 50 minutes for the springform pan or 35 to 40 minutes for the 9-inch pan. Cool on a wire rack for 10 minutes. Remove from pan. Cool completely.

Spread 1/4 cup Chocolate Glaze evenly over top and sides of cake. Chill for 10 minutes. Frost top and sides of cake with remaining glaze. Chill until set. Let stand at room temperature for 10 to 15 minutes before serving. If desired, garnish with fresh cherries. Makes 12 to 16 servings.

Chocolate Glaze
In a glass measure combine 6 ounces semisweet chocolate, cut up, and 2 tablespoons margarine or butter; micro-cook on high 1-1/2 to 2 minutes or until melted, stirring twice.

Chocolate Hazelnut Ice Cream Sandwiches

Chocolate Hazelnut Ice Cream Sandwiches

16 chocolate wafers (such as Nabisco Famous Chocolate Wafers)
1/3 cup chocolate hazelnut spread, (such as Nutella)
1 pint premium chocolate ice cream
1/3 cup chopped toasted hazelnuts

Spread flat side of each wafer with hazelnut spread; set aside. Scoop 8 ice cream balls, about 3 tablespoons each; keep in freezer until ready to assemble.

To assemble sandwiches, remove ice cream balls from freezer; let stand 1 minute to soften. Place 1 cream ball on 8 hazelnut-spread wafers. Top with remaining wafers; press gently together.

Sprinkle edges with nuts. Place sandwiches on baking sheet lined with waxed paper; freeze 3 hours or until firm. To store, freeze up to two weeks in self-sealing plastic bags. Makes 8 sandwiches.

Feathering on Chocolate Cakes

Feathering on Chocolate Cakes

This is a popular and pretty design for cake decorating, and works for any kind of chocolate cake recipe.

Melt a contrasting chocolate to the chocolate icing or covering being used. Spread the chocolate icing over the cake. Place the contrasting colour into a piping bag, and pipe lines or a spiral over the chocolate covered cake.

With a skewer, draw lines across the cake, first one direction, then the other; this creates the feathered cake decoration.

French Hot Chocolate

French Hot Chocolate

50g plain chocolate, finely chopped
30g caster sugar, to taste
2 large pinches of cinnamon
½ vanilla pod, split length ways

Put 300 ml of water into a heavy bottomed saucepan, bring to the boil, then remove from the heat, then add the chocolate, sugar and cinnamon. Using the tip of a knife, scrape the seeds from the vanilla pod and add into the saucepan mixture.

Using a balloon whisk, whisk the mixture thoroughly; when a good amount of froth has been created, pour the mixture into the warmed mugs, spooning the froth on top!

Double Dark-Chocolate and Ginger Biscotti


1 cup all-purpose flour, spooned and leveled
1/3 cup unsweetened cocoa powder
1 1/2 teaspoons baking powder
1/4 teaspoon salt
1 large egg, plus 1 large egg yolk
1/2 cup sugar
1 teaspoon vanilla extract
1/4 cup canola oil
1/2 cup walnuts, coarsely chopped
3 ounces dark chocolate*, coarsely chopped (1/2 cup)
1/4 cup finely chopped crystallized ginger

*Avoid getting water in the chocolate mixture

Preheat oven to 350 degrees. Line a large baking sheet with parchment paper.

In a medium bowl, whisk together flour, cocoa powder, baking powder, and salt until well combined; set aside. In the large bowl of an electric mixer, beat egg, egg yolk, and sugar until light and fluffy; beat in the vanilla and oil until well combined.

With the mixer on low, beat in dry ingredients until combined. Fold in walnuts, chocolate, and ginger with a rubber spatula (dough will be stiff).

With moistened hands shape the dough into 2 logs, each about 9 inches long and 2 1/2 inches wide. Bake until set on top, about 20 minutes. Cool 10 minutes in pan. Reduce oven temperature to 325 degrees.

Transfer logs to a cutting board and, with a serrated knife, cut each log on the diagonal into 16 slices, each 1/2 inch thick. Bake until crisp, about 20 minutes, turning the biscotti over midway through. Cool 5 minutes on a baking sheet, then transfer to a wire rack to cool completely. Store in an airtight container for up to a week.

Benefit of Dark chocolate

Dark chocolate contains a high concentration of stearic acid (a saturated fatty acid with a neutral effect on cholesterol), essential minerals including magnesium, copper, potassium, manganese, and most significant, flavonoids. The latter are phytochemical plant pigments that act as natural antioxidants, neutralizing free radicals that can damage body tissue and cells.

Dark chocolate actually contains more flavonoids per gram than any other food tested so far, including green tea, red wine, and blueberries. The good news doesn't stop there. The high percentage of cocoa in dark chocolate also gives it a low glycemic index, a ranking of carbohydrates according to their effect on our blood glucose levels. This means it produces only small fluctuations in blood glucose and insulin levels.

Monday, June 21, 2010

Spicy Hot Dark Chocolate

Spicy Hot Dark Chocolate

6 ounces dark chocolate, coarsely chopped
1 quart soy milk
1/2 teaspoon ground cinnamon
1/8 to 1/4 teaspoon ground cardamom
1/8 teaspoon ground cayenne pepper
1/8 teaspoon coarse salt

In a small saucepan, combine all ingredients and whisk over medium-low heat until the chocolate has melted completely and the mixture is steaming hot, about 5 minutes. Serve.

According to Ayurvedic medicine, warming spices such as cinnamon and cardamom can help boost energy. And by swapping soy milk for regular, you ensure that dark chocolate's antioxidants will be more fully absorbed.

Thursday, June 17, 2010

How Can I Prevent Chocolate from Seizing?

The most important thing you can do to prevent chocolate from seizing is to eliminate any chance of the chocolate coming into contact with water.

Always make sure the bowls and utensils you are using are perfectly dry. Avoid using wooden spoons or boards, as they might retain moisture and impart this moisture to your chocolate.

If you are using a double boiler to melt your chocolate, keep the water hot but not boiling, or turn off the heat before the chocolate is placed on top. Boiling water might splash above the rim of the saucepan and cause droplets to fall in the chocolate.

In addition, boiling water gives off a great deal of steam, and steam can also cause chocolate to seize. Be sure to wipe the bottom of the bowl the chocolate is melting in on a regular basis, to remove water and condensation.

Finally, never cover warm chocolate with a lid, as the heat of the chocolate might form condensation on the inside of the bowl, which will cause the chocolate to seize.

Tuesday, June 15, 2010

Melting Chocolate With Liquids

Many recipes call for melting chocolate along with liquids like milk, cream, water, or liqueurs. Melting chocolate with liquids is often faster and more convenient, since it often speeds melting times and prevents common chocolate problems like overheating. However, there are a few things to keep in mind when melting chocolate with other substances.

Chocolate should never be melted with very small amounts of liquid. Always use at least 1 tablespoon of liquid for every 2 ounces of chocolate. This prevents the dry particles (cocoa and sugar) in the chocolate from binding together and becoming lumpy.

Very dark chocolates may require more than this guideline, so be prepared to add another spoonful or two of liquid if necessary.

When adding large quantities of liquid, add it all at once, rather than in small amounts, to prevent the chocolate from thickening.

Cold liquids should never be added to melted chocolate, as it can cause the chocolate to seize. Instead, ensure that your liquids are warm (but not boiling) when you add them to chocolate.

Additionally, many recipes, like ganache, call for hot liquids to be poured over chopped chocolate. The heat from the liquid melts the chocolate, while the room temperature chocolate cools down the liquid. If you are following this method, allow the hot liquid and chocolate mixture to sit for a few minutes, then gently whisk them together until completely incorporated.

Another useful tool for combining chocolate and hot liquids is an immersion blender. This hand held gadget does an excellent job of creating a smooth emulsion without incorporating air bubbles. Food processors, blenders, and electric mixers can also be used at low speeds.

Sunday, June 13, 2010

Soft-centered chocolate puddings

Soft-centered chocolate puddings

125g butter, plus 2 tsp extra
150g bittersweet dark chocolate, chopped
2 eggs, plus 2 egg yolks
125g sugar
1 tsp vanilla extract
35g plain flour, sifted

Heat oven to 170C. Use 2 tsp butter to grease four 150ml heatproof souffle moulds, or ramekins, and place on a baking tray.

Melt the butter and chocolate in a heatproof bowl set over a pot of gently simmering water. Using an electric beater, beat the eggs, yolks, sugar and vanilla for a minute or two until pale. Fold in the flour, then fold in the chocolate mixture. Pour into the moulds to fill by three-quarters.

Bake for 10-12 minutes until risen, when the cake is set but the centre still moves a little when jiggled. Remove from the oven and from the tray.

Run a palette knife around each pudding, gently invert on to warm plates and serve immediately.

Tip: You can prepare these ahead and refrigerate the moulds for two or three hours. If baking from cold, add another minute or two to the cooking time.

Chocolate Roses

Chocolate Roses

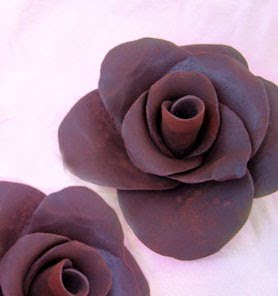
Chocolate Roses are beautiful and delicious lifelike flowers made out of a modeling material called chocolate plastic. Chocolate plastic recipe can be seen below or just click on the link to create the chocolate plastic for the roses.

One-half pound of white,
milk,
or dark chocolate plastic

Begin by kneading your chocolate plastic until it is smooth and supple. If you are using white chocolate plastic, knead it in powdered sugar, and if you are using milk or dark chocolate plastic, knead it in unsweetened cocoa powder. If the plastic is too hard to knead, microwave it in five-second intervals just until it becomes pliable. Do not microwave it too long, or it will be too soft to work with.

Dust your work surface and a rolling pin with powdered sugar or cocoa powder, and roll the chocolate plastic out into a very thin layer, less than 1/8” thick. If you are working with a large amount of chocolate plastic, you might want to divide it in half and roll it out in batches.

Use a small round cutter to cut circles from the plastic. For one full-sized rose, you will need nine circles, and for rosebuds, you will need 4-5. The size of the circle cutter determines the size of your finished rose. A 1.5” cutter will yield a full-sized rose that is approximately 3” wide.

Begin by forming the center of your rose: take one of the cut circles and roll it into a cylinder. Leave a small hole at the top of the cylinder, and a larger hole at the bottom.

Take another circle, and use your fingers to flatten one end of it until it is paper-thin. This will be the top of the petal, and it helps give the rose a more delicate look. Wrap your petal around the cylinder, making the top of the petal level with the top of the cylinder, pressing it at the bottom to adhere the chocolate plastic.

Thin out the edge of another circle, and overlap it over the first petal. Add a third petal overlapping the second to complete the first layer of petals. If you want to make a rosebud, your flower is now complete. To make a full rose, continue to the next step.

Use the remaining five petals to add a second layer to the rose, thinning the top edges as before, and overlapping the petals as with the first layer. Curl the outer petals back slightly to make your rose bloom. Pinch off any extra plastic at the base of the flower, and re-roll it with the plastic scraps to create more roses.

Allow the roses to sit at room temperature and dry for 24 hours. Once set, they can be stored in an airtight container indefinitely.

Saturday, June 12, 2010

Chocolate plastic

Chocolate plastic

Chocolate plastic is a delicious, versatile chocolate paste that can be used to make cut-out decorations.

1 lb white chocolate
1/2 cup light corn syrup
food coloring (optional)

Chop the chocolate, and place it in a large microwave-safe bowl.

Microwave the chocolate until melted, stirring after every 45 seconds to avoid overheating the chocolate.

Remove the melted chocolate from the microwave, and stir until smooth. Add the corn syrup and stir until the mixture is thoroughly combined.

Spoon the chocolate onto a large sheet of plastic wrap, and wrap it securely. Allow the chocolate to cool and solidify at room temperature, for at least 6 hours or overnight.

Soften the hardened chocolate by kneading it with glove-covered hands, or microwave it in short 10-second intervals until it becomes soft enough to work with. Continue to knead until it is smooth and pliable. Do not worry if your chocolate plastic has lumps--these can be worked out through the kneading process. Dust your hands with powdered sugar if the chocolate begins to stick. At this point, you can divide it and knead different food colorings into the chocolate, if desired. Be sure to change your gloves between batches to avoid muddying the colors.

Dust your work surface with a thin layer of powdered sugar. Roll out the chocolate plastic until it is very thin (about 1/8-inch). Alternately, you can use a pasta roller to make thin ribbons or strips.

Now you’re ready to decorate with your chocolate plastic! You can cut out shapes or letters with cookie cutters or a knife, or form the chocolate plastic into ribbons and bows, or use large sheets of plastic to wrap entire cakes or petit fours.

Gather remaining scraps of chocolate plastic and wrap tightly. Store in a cool cupboard and use within 2-3 weeks. To re-use, repeat the softening instructions in step 5.

Friday, June 11, 2010

Melting Chocolate in the Microwave

The microwave is a great tool for melting chocolate. If used properly, it can melt chocolate more quickly than a double boiler with minimal effort and mess. The most critical part of melting chocolate in the microwave is choosing an appropriate container. Ideally, you want to melt your chocolate in a microwave-safe bowl that remains cool or only slightly warm after several minutes of near-continuous microwaving.

If the bowl is too hot for you to handle after it has been microwaved, it is too hot for your chocolate. If you have overheated your chocolate, immediately pour it into a cool bowl add chunks of unmelted chocolate, and stir continuously.

It is preferable to melt your chocolate on a low (50%) power setting, to avoid scorching or burning it. If your microwave does not have this option, heat the chocolate in shorter intervals and stir between each bout of heat. Additionally, if your microwave does not have a turntable that rotates the bowl of chocolate, manually turn the bowl each time you stop and stir the chocolate.

It is very difficult to determine exact microwaving times, as it can vary depending on microwave wattage, quantity of chocolate, and even the cocoa butter content of the chocolate.

However, as a rough guide, estimate about 1 minute for 1 ounce of chocolate, 3 minutes for 8 ounces of chocolate, 3.5 minutes for 1 pound of chocolate, and 4 minutes for 2 pounds. Run the microwave in 30 second-1 minute increments, stirring in between and rotating the bowl if necessary.

Finish heating when most, but not all, of the chocolate is melted. Stir the chocolate continuously until it is smooth, shiny, and completely melted.

Thursday, June 10, 2010

Chocolate Pears

Chocolate Pears

500mL water
100g caster sugar
2 cinnamon sticks
4-6 firm, tall pears

The sauce :
100g bitter sweet chocolate

Combine water, sugar and cinnamon sticks in a saucepan and bring to the boil, stirring. Peel the pears, leaving the stem intact, and trim the base flat. Gently poach the pears in spiced water for 15-20 minutes, depending on ripeness.

For the sauce Melt the chocolate in a heatproof bowl set over a pan of gently simmering water. Cool slightly and beat. Add pear syrup by the spoonful to sweeten to taste and bring to pouring consistency.

Drain the pears and stand upright, one to a plate. Spoon or pour the chocolate yoghurt over each pear until completely coated.

How Can I Save Overheated Chocolate?

First, you will want to cool the chocolate, as it is harder to save overheated chocolate that has been at a high temperature for a long time.

To cool the chocolate, remove the bowl from the heat source, transfer the chocolate to a dry, cool bowl, and stir in a handful of solid chocolate chunks. Stir constantly and allow the solid chocolate to bring down the temperature of the melted chocolate.

If the chocolate remains thick or lumpy, try straining it through a sieve first. If this doesn’t solve the problem, add a spoonful of vegetable oil or melted vegetable shortening and stir thoroughly.

You can also try adding some freshly melted chocolate with a few drops of soya liquid lecithin (an emulsifier, available at health food stores), or using a handheld immersion blender to smooth the chocolate. If none of these tricks helps your chocolate, save it for use in baking recipes and begin again with a fresh batch of chocolate.

What is Overheated Chocolate?

Chocolate is very sensitive to high temperatures. Dark chocolate should never be heated above 120 degrees, while milk and white chocolates should never be heated about 110 degrees. It is quite easy to exceed these temperatures if using a double boiler with boiling water, or if microwaving on full power.

Overheated chocolate will lose the silky shine of melted chocolate and become thick and muddy. The best way to melt chocolate is to keep the water in a double boiler hot (but not boiling), and to employ a chocolate or instant-read thermometer while melting the chocolate.

Wednesday, June 9, 2010

Chocolate Eclairs

Chocolate Eclairs

1 (3.5 ounce) package non-instant chocolate pudding mix
2 cups milk

1/2 cup butter
1 cup water
1/8 teaspoon salt
1 cup all-purpose flour
4 eggs

2 tablespoons butter
2 ounces semisweet chocolate, chopped
1 cup confectioners' sugar
2 tablespoons milk
1 teaspoon vanilla extract

Prepare pudding with milk according to package directions. Chill 1 hour in refrigerator.

Preheat oven to 400 degrees F (200 degrees C). Grease baking sheets.

In a heavy saucepan, combine 1/2 cup butter, water and salt over medium-high heat. Bring to a boil, then reduce heat to low. Pour in flour all at once and stir vigorously until fully incorporated and mixture forms a ball. Remove from heat, let rest 5 minutes. Then beat in eggs, one at a time, until well combined.

Drop dough into twelve equal mounds on baking sheets. Spread each mound into a 4x1/2 inch rectangle.

Bake in preheated oven 35 minutes, until golden. Remove from oven and make a one-inch slit in the side of each eclair. Reduce heat to 375 degrees F (190 degrees C). Return eclairs to oven for 10 minutes. Transfer to a wire rack to cool completely.

Prepare icing while eclairs are cooling. Heat 2 tablespoons butter with chocolate in a small saucepan over medium heat, stirring until melted. Remove from heat and stir in confectioners' sugar, 2 tablespoons milk and vanilla. Set aside.

To assemble: Slice each eclair in half lengthwise. Spoon about 1 tablespoon chocolate pudding into the bottom half of each eclair. Replace tops and frost with chocolate icing. Chill until serving.

Liquor-Infused Chocolate Strawberries

Liquor-Infused Chocolate Strawberries

16 large fresh strawberries with leaves
1/2 cup brandy-based orange liqueur
1 pound bittersweet chocolate, chopped
2 tablespoons shortening
2 tablespoons heavy cream
1/4 cup brandy-based orange liqueur
1 (1 ounce) square chopped white chocolate

Rinse strawberries and dry thoroughly. Use a syringe or clean marinade injector to inject about 2 teaspoons of brandy into each berry. Place them on a baking sheet, and refrigerate for about 30 minutes.

In a metal bowl over a pan of simmering water, combine bittersweet chocolate and shortening. Stir occasionally until melted and smooth. Stir in heavy cream and 1/4 cup of brandy.

Place white chocolate in a separate bowl, and when the dark chocolate has melted, place the bowl of white chocolate over the pan of simmering water, stirring occasionally until smooth. Be sure to remove from heat as soon as it is mostly melted, white chocolate can be sensitive.

Dip strawberries into chocolate, and let the excess drip off into the bowl before placing on waxed paper to set. When the strawberries have all been dipped in chocolate, dip a fork into the white chocolate, and drizzle back and forth over berries to stripe.

Sunday, June 6, 2010

Chocolate Peanut Butter Cups

Chocolate Peanut Butter Cups

1 (11.5 ounce) package milk chocolate chips, divided
1 cup peanut butter
1/4 teaspoon salt
1/2 cup confectioners' sugar

Trim 12 paper muffin cup liners to half of their height.

Place 1/2 chocolate chips in a microwave safe container. Microwave for 2 minutes, stirring after each minute. Spoon melted chocolate into muffin cups, filling halfway. With a spoon, draw the chocolate up the sides of the cups until evenly coated. Cool in the refrigerator until firm.

In a small bowl, mix together peanut butter, confectioners' sugar and salt. divide into the chocolate cups. Melt the remaining chocolate, and spoon over peanut butter. Spread chocolate to edges of cups.

Chocolate Mints

Chocolate Mints

3 cups milk chocolate chips
1 (1 ounce) square unsweetened chocolate, chopped
1 tablespoon butter
1 (14 ounce) can sweetened condensed milk
1 teaspoon peppermint extract
1 teaspoon vanilla extract

Butter an 8x8 inch dish.

In a medium saucepan over low heat, combine milk chocolate chips, unsweetened chocolate and butter.

Heat until melted and smooth, stirring occasionally.
Remove from heat and stir in condensed milk, peppermint extract and vanilla extract.

Beat with an electric mixer at a low speed for 1 minute, then at a high speed for 1 minute.

Chill mixture for 15 minutes, beating by hand every 5 minutes.

Beat again with electric mixer two minutes more. Pour into prepared pan and chill until firm.

Cut into 1/2 inch squares.

Chocolate Covered Marshmallows

Chocolate Covered Marshmallows

2 cups semisweet chocolate chips
10 large marshmallows
Topping, anything you like, most people use baked crunched peanuts

Melt the chocolate in a microwave-safe glass or ceramic bowl in 30-second intervals, stirring after each interval. Do not overheat or chocolate will scorch.

Dip the marshmallows in chocolate using a toothpick or fork to hold them. Place on waxed paper or aluminum foil, add some baked peanuts topping and freeze.

Let marshmallows sit at room temperature for 5 minutes before serving.

Tuesday, June 1, 2010

Nutty Caramel Clusters

Nutty Caramel Clusters25 caramels
1 tablespoon butter
1 tablespoon milk
1 cup sliced almonds
1/2 cup salted dry-roasted peanuts
1/2 cup pecan halves
1/2 cup semisweet chocolate chips
2 teaspoons shortening

In a 1-qt. microwave-safe dish, combine the caramels, butter and milk. Microwave, uncovered, on high for 1-1/2 to 2 minutes or until caramels are melted, stirring once. Stir in the almonds, peanuts and pecans. Drop by tablespoonfuls onto waxed paper-lined baking sheets.

In a microwave-safe bowl, melt chocolate chips and shortening; stir until blended. Spoon over clusters. Refrigerate until set. Store in an airtight container in the refrigerator.