Wednesday, June 23, 2010

Double Dark-Chocolate and Ginger Biscotti


1 cup all-purpose flour, spooned and leveled
1/3 cup unsweetened cocoa powder
1 1/2 teaspoons baking powder
1/4 teaspoon salt
1 large egg, plus 1 large egg yolk
1/2 cup sugar
1 teaspoon vanilla extract
1/4 cup canola oil
1/2 cup walnuts, coarsely chopped
3 ounces dark chocolate*, coarsely chopped (1/2 cup)
1/4 cup finely chopped crystallized ginger

*Avoid getting water in the chocolate mixture

Preheat oven to 350 degrees. Line a large baking sheet with parchment paper.

In a medium bowl, whisk together flour, cocoa powder, baking powder, and salt until well combined; set aside. In the large bowl of an electric mixer, beat egg, egg yolk, and sugar until light and fluffy; beat in the vanilla and oil until well combined.

With the mixer on low, beat in dry ingredients until combined. Fold in walnuts, chocolate, and ginger with a rubber spatula (dough will be stiff).

With moistened hands shape the dough into 2 logs, each about 9 inches long and 2 1/2 inches wide. Bake until set on top, about 20 minutes. Cool 10 minutes in pan. Reduce oven temperature to 325 degrees.

Transfer logs to a cutting board and, with a serrated knife, cut each log on the diagonal into 16 slices, each 1/2 inch thick. Bake until crisp, about 20 minutes, turning the biscotti over midway through. Cool 5 minutes on a baking sheet, then transfer to a wire rack to cool completely. Store in an airtight container for up to a week.

Benefit of Dark chocolate

Dark chocolate contains a high concentration of stearic acid (a saturated fatty acid with a neutral effect on cholesterol), essential minerals including magnesium, copper, potassium, manganese, and most significant, flavonoids. The latter are phytochemical plant pigments that act as natural antioxidants, neutralizing free radicals that can damage body tissue and cells.

Dark chocolate actually contains more flavonoids per gram than any other food tested so far, including green tea, red wine, and blueberries. The good news doesn't stop there. The high percentage of cocoa in dark chocolate also gives it a low glycemic index, a ranking of carbohydrates according to their effect on our blood glucose levels. This means it produces only small fluctuations in blood glucose and insulin levels.

Monday, June 21, 2010

Spicy Hot Dark Chocolate

Spicy Hot Dark Chocolate

6 ounces dark chocolate, coarsely chopped
1 quart soy milk
1/2 teaspoon ground cinnamon
1/8 to 1/4 teaspoon ground cardamom
1/8 teaspoon ground cayenne pepper
1/8 teaspoon coarse salt

In a small saucepan, combine all ingredients and whisk over medium-low heat until the chocolate has melted completely and the mixture is steaming hot, about 5 minutes. Serve.

According to Ayurvedic medicine, warming spices such as cinnamon and cardamom can help boost energy. And by swapping soy milk for regular, you ensure that dark chocolate's antioxidants will be more fully absorbed.

Thursday, June 17, 2010

How Can I Prevent Chocolate from Seizing?

The most important thing you can do to prevent chocolate from seizing is to eliminate any chance of the chocolate coming into contact with water.

Always make sure the bowls and utensils you are using are perfectly dry. Avoid using wooden spoons or boards, as they might retain moisture and impart this moisture to your chocolate.

If you are using a double boiler to melt your chocolate, keep the water hot but not boiling, or turn off the heat before the chocolate is placed on top. Boiling water might splash above the rim of the saucepan and cause droplets to fall in the chocolate.

In addition, boiling water gives off a great deal of steam, and steam can also cause chocolate to seize. Be sure to wipe the bottom of the bowl the chocolate is melting in on a regular basis, to remove water and condensation.

Finally, never cover warm chocolate with a lid, as the heat of the chocolate might form condensation on the inside of the bowl, which will cause the chocolate to seize.

Tuesday, June 15, 2010

Melting Chocolate With Liquids

Many recipes call for melting chocolate along with liquids like milk, cream, water, or liqueurs. Melting chocolate with liquids is often faster and more convenient, since it often speeds melting times and prevents common chocolate problems like overheating. However, there are a few things to keep in mind when melting chocolate with other substances.

Chocolate should never be melted with very small amounts of liquid. Always use at least 1 tablespoon of liquid for every 2 ounces of chocolate. This prevents the dry particles (cocoa and sugar) in the chocolate from binding together and becoming lumpy.

Very dark chocolates may require more than this guideline, so be prepared to add another spoonful or two of liquid if necessary.

When adding large quantities of liquid, add it all at once, rather than in small amounts, to prevent the chocolate from thickening.

Cold liquids should never be added to melted chocolate, as it can cause the chocolate to seize. Instead, ensure that your liquids are warm (but not boiling) when you add them to chocolate.

Additionally, many recipes, like ganache, call for hot liquids to be poured over chopped chocolate. The heat from the liquid melts the chocolate, while the room temperature chocolate cools down the liquid. If you are following this method, allow the hot liquid and chocolate mixture to sit for a few minutes, then gently whisk them together until completely incorporated.

Another useful tool for combining chocolate and hot liquids is an immersion blender. This hand held gadget does an excellent job of creating a smooth emulsion without incorporating air bubbles. Food processors, blenders, and electric mixers can also be used at low speeds.

Sunday, June 13, 2010

Soft-centered chocolate puddings

Soft-centered chocolate puddings

125g butter, plus 2 tsp extra
150g bittersweet dark chocolate, chopped
2 eggs, plus 2 egg yolks
125g sugar
1 tsp vanilla extract
35g plain flour, sifted

Heat oven to 170C. Use 2 tsp butter to grease four 150ml heatproof souffle moulds, or ramekins, and place on a baking tray.

Melt the butter and chocolate in a heatproof bowl set over a pot of gently simmering water. Using an electric beater, beat the eggs, yolks, sugar and vanilla for a minute or two until pale. Fold in the flour, then fold in the chocolate mixture. Pour into the moulds to fill by three-quarters.

Bake for 10-12 minutes until risen, when the cake is set but the centre still moves a little when jiggled. Remove from the oven and from the tray.

Run a palette knife around each pudding, gently invert on to warm plates and serve immediately.

Tip: You can prepare these ahead and refrigerate the moulds for two or three hours. If baking from cold, add another minute or two to the cooking time.

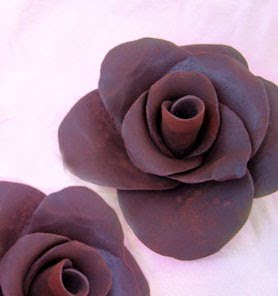
Chocolate Roses

Chocolate Roses

Chocolate Roses are beautiful and delicious lifelike flowers made out of a modeling material called chocolate plastic. Chocolate plastic recipe can be seen below or just click on the link to create the chocolate plastic for the roses.

One-half pound of white,
milk,
or dark chocolate plastic

Begin by kneading your chocolate plastic until it is smooth and supple. If you are using white chocolate plastic, knead it in powdered sugar, and if you are using milk or dark chocolate plastic, knead it in unsweetened cocoa powder. If the plastic is too hard to knead, microwave it in five-second intervals just until it becomes pliable. Do not microwave it too long, or it will be too soft to work with.

Dust your work surface and a rolling pin with powdered sugar or cocoa powder, and roll the chocolate plastic out into a very thin layer, less than 1/8” thick. If you are working with a large amount of chocolate plastic, you might want to divide it in half and roll it out in batches.

Use a small round cutter to cut circles from the plastic. For one full-sized rose, you will need nine circles, and for rosebuds, you will need 4-5. The size of the circle cutter determines the size of your finished rose. A 1.5” cutter will yield a full-sized rose that is approximately 3” wide.

Begin by forming the center of your rose: take one of the cut circles and roll it into a cylinder. Leave a small hole at the top of the cylinder, and a larger hole at the bottom.

Take another circle, and use your fingers to flatten one end of it until it is paper-thin. This will be the top of the petal, and it helps give the rose a more delicate look. Wrap your petal around the cylinder, making the top of the petal level with the top of the cylinder, pressing it at the bottom to adhere the chocolate plastic.

Thin out the edge of another circle, and overlap it over the first petal. Add a third petal overlapping the second to complete the first layer of petals. If you want to make a rosebud, your flower is now complete. To make a full rose, continue to the next step.

Use the remaining five petals to add a second layer to the rose, thinning the top edges as before, and overlapping the petals as with the first layer. Curl the outer petals back slightly to make your rose bloom. Pinch off any extra plastic at the base of the flower, and re-roll it with the plastic scraps to create more roses.

Allow the roses to sit at room temperature and dry for 24 hours. Once set, they can be stored in an airtight container indefinitely.